October 19, 2013
Part 1: Threshold/Fade-to-Black Detection
This tutorial is currently being migrated from the old location. In the meantime, you can view the cached version of the previous, complete version on The Wayback Machine by clicking here. Thank you for your patience during this time.
In the first part of this three-part tutorial, we will write a Python program, using the OpenCV library, to perform threshold-based scene detection, to determine the exact frames where scene transitions (fade ins/outs to/from black in this case) occur. In the following tutorials, we will optimize our scene detection algorithm, and use the output to create a scene list with proper timecodes (Part 2) so a video can be split automatically into scenes. Lastly, we will cover how to detect content-based scene changes (in a future Part 3, coming soon), and combine this with the concepts from the previous tutorials to create a robust scene detection program.
You can download the source code and test video from this tutorial via the Github repository (see the Releases page to download everything in a single zip/tar archive).
Introduction & Installation
The OpenCV bindings for Python allow you to quickly experiment with images/videos. Specifically, the OpenCV library handles all the low-level interfacing to actually decode video data (using FFmpeg, and thus is compatible with many different video formats), and uniquely, the returned video frames – as well as other image objects for that matter – can be accessed as a NumPy array. This allows you to perform MATLAB/Octave-like operations on the image data easily and concisely.
Firstly, this tutorial assumes that you have installed Python 2.7 (I believe at the time of writing this, the OpenCV bindings are only available for 2.7), as well as the OpenCV bindings themselves. If you are a Windows user, you might want to see this question on Stack Overflow; on Linux, I was able to install the bindings right from my package manager. To verify that everything is installed correctly, fire up a Python console, and type import cv2. If there are no errors, everything should be set up correctly!
The Problem at Hand
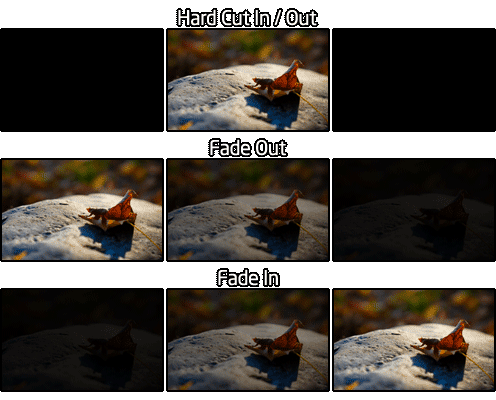
The goals of this program (PySceneDetect) are to detect when a scene change in a video occurs. In this particular tutorial, we will focus on fades in from, or out to black. The following figure depicts the type of scene changes we will be detecting:
The output of PySceneDetect will be a text-file containing the timestamps of each event (either a fade-from or fade-to black). The idea is that these timecodes can then be used to split the source video into individual scenes with another program (mkvmerge, VideoDub, etc…). In this part of the tutorial, we will print the time and frame number for each fade event to the console.
Decoding Video Frames
Let’s begin by creating a VideoCapture object, which can be used to open either a camera stream or a video file, and retrieve individual frames. Let’s assume the name of the video is passed as the first argument to the script, and do some simple error checking and cleanup just to be safe:
import sys
import cv2

def main():
    if len(sys.argv) < 2:
        print "Error - file name must be specified as first argument."
        return

    cap = cv2.VideoCapture()
    cap.open(sys.argv[1])

    if not cap.isOpened():
        print "Fatal error - could not open video %s." % sys.argv[1]
        return
    else:
        print "Parsing video %s..." % sys.argv[1]

    # Do stuff with cap here.


    cap.release()


if __name__ == "__main__":
    main()
Once we have a valid VideoCapture object (i.e. the isOpened() method returns true), we can use the read() method to start grabbing frames. Note that read() returns a tuple in the form (retval, image), and when retval is returned as false, this denotes that there are no more frames in the object to grab (and thus we are at the end of the video). Let’s make a loop to scan through the video and retrieve each frame, as well as print some basic information about the video):
width  = cap.get(cv2.cv.CV_CAP_PROP_FRAME_WIDTH)
height = cap.get(cv2.cv.CV_CAP_PROP_FRAME_HEIGHT)
print "Video Resolution: %d x %d" % (width, height)

while True:
    (rv, im) = cap.read()   # im is a valid image if and only if rv is true

    if not rv:
        break
    # Do stuff with im here.


frame_count = cap.get(cv2.cv.CV_CAP_PROP_POS_FRAMES)  # current capture position

print "Read %d frames from video." % frame_count
Note that the returned image im is a Mat type object, and can be accessed with the same methods as a NumPy array due to the compatibility in it’s implementation.
Working With Images & Detecting Scene Changes
Now that we have the image, we need to analyze it to determine when a scene cut occurs. Since we want to know when we have faded in or out of black, we can compute the average intensity of the pixels in the image, and compare this with a set threshold denoting the black level. We need to compare the average to a threshold and not simply zero, since compression artifacts or encoders sometimes will not produce a fully black frame.
Since we have the ability to access im as if it were a NumPy array, we can use the mean() ndarray method on im to compute the average intensity of the pixels in the frame. We can compare this value to our set threshold, as well as the average intensity of the past frame (to determine if we are fading in to or out from a scene) to determine where the scene cuts occur by modifying the above while-loop as follows:
# Allow the threshold to be passed as an optional second argument to the script.

threshold = 15
if len(sys.argv) > 2 and int(sys.argv[2]) > 0:
    threshold = int(sys.argv[2])
print "Detecting scenes with threshold %d." % threshold

last_mean = 0       # Mean pixel intensity of the *last* frame we processed.


while True:
    (rv, im) = cap.read()   # im is a valid image if and only if rv is true

    if not rv:
        break
    frame_mean = im.mean()

    # Detect fade in from black.

    if frame_mean >= threshold and last_mean < threshold:
        print "Detected fade in at %dms (frame %d)." % (
            cap.get(cv2.cv.CV_CAP_PROP_POS_MSEC),
            cap.get(cv2.cv.CV_CAP_PROP_POS_FRAMES) )

    # Detect fade out to black.

    elif frame_mean < threshold and last_mean >= threshold:
        print "Detected fade out at %dms (frame %d)." % (
            cap.get(cv2.cv.CV_CAP_PROP_POS_MSEC),
            cap.get(cv2.cv.CV_CAP_PROP_POS_FRAMES) )

    last_mean = frame_mean     # Store current mean to compare in next iteration.
And it’s that easy – you now know when a scene is fading in or out from your videos, based on the defined threshold! While the timecode is presented in milliseconds, a frame number is also shown, which should help if you just want to manually find scene changes in a video. In practice, I found the mean() methods provided by OpenCV and NumPy to be fairly slower than computing the average from the sum and image size:
    # Compute mean intensity of pixels in frame.

    # Previously: frame_mean = im.mean()

    frame_mean = np.sum(im) / float(im.shape[0] * im.shape[1] * im.shape[2])
    # Dividing the sum by the image size is 35-40% faster than using

    # either im.mean() or np.mean(im).
This change brings the runtime down from 4.10 seconds to 2.86 seconds (for parsing the entire testvideo.mp4 file), with a resulting increase in processing speed from 176 FPS to 251 FPS.
Testing & Conclusion
You can download the source code and test video from this tutorial via the Github repository (see the Releases page to download everything in a single zip/tar archive). The code from this part is in the file part1-threshold.py.
Invoking the Python program for this part using the included testvideo.mp4 file, you should obtain this output:
> python ./part1-threshold.py testvideo.mp4
Parsing video testvideo.mp4...
Video Resolution: 1280 x 720
Detecting scenes with threshold = 15.

Detected fade in at 1167ms (frame 35).
Detected fade out at 6172ms (frame 185).
Detected fade in at 7440ms (frame 223).
Detected fade out at 11945ms (frame 358).
Detected fade in at 13480ms (frame 404).
Detected fade out at 23156ms (frame 694).
Read 719 frames from video in 2.86 seconds (avg. 251.1 FPS).
If we change the threshold from 15 to 50, we see that it has the expected result for each type of cut. Hard cuts are unaffected, and the fade in/out times are shifted forwards/backwards in time, respectively:
> python ./part1-threshold.py testvideo.mp4 50
Parsing video testvideo.mp4...
Video Resolution: 1280 x 720
Detecting scenes with threshold = 50.

Detected fade in at 1167ms (frame 35).
Detected fade out at 6172ms (frame 185).
Detected fade in at 7974ms (frame 239).
Detected fade out at 11411ms (frame 342).
Detected fade in at 13913ms (frame 417).
Detected fade out at 22722ms (frame 681).
Read 719 frames from video in 2.96 seconds (avg. 242.9 FPS).
Just as expected! And that’s all for the first part. You can use the program for this part as-is, for a quick method to determine the frame numbers where transitions to/from black occur in a video; see the header of the part1-threshold.py file for usage details.
The next tutorial in the series is Part 2: Adaptive Threshold Detection, where we optimize the performance of the algorithm, and use the output to export a list of scenes/chapters (instead of fades).
Post last updated September 15, 2014, and moved to new location on September 8, 2017.